


NextJS, TypeScript
NextJS
React 기반 JavaScript 프레임워크
특징
1. 내장 서버 측 렌더링
2. 파일기반 라우팅
파일과 폴더를 이용해서 라우트 정의
3. 풀스택 앱 빌드
NextJS는 사전 렌더링 기능을 내장하기 때문에 public 폴더에 index.js파일이 따로 존재하지 않는다.
라우팅
파일이 pages 디렉터리에 추가되면 자동으로 경로 사용 가능
- 폴더 구조로 만들면 중첩 경로로 라우팅이 가능하다
- []로 이름 작성 시 동적 경로로 사용 가능하다 / ex) [param].js
├── Pages
      ├── posts
      │     ├── index.js
      │     └── [postId].js
      ├── index.js
라우트 객체에 접근하기 위해선 NextJS에서 사용되는 useRouter() 훅을 사용한다.
Link 컴포넌트
페이지를 연결해 주기 위해서 Link 컴포넌트 사용
import Link from 'next/link';

function Page() {
    return (
        ...
            <Link href="/news/nextjs-is-a-great-framework">NextJS Is A Great Framework</Link>
        ...
    );
}
_app.js
_app은 서버로 요청이 들어왔을 때 가장 먼저 실행되는 컴포넌트로, 페이지에 적용할 공통 레이아웃의 역할
사전 렌더링
1. Static Site Generation (SSG)
페이지가 빌드 시 생성, 특정 함수 사용 시 페이지를 렌더링 할 때 함수 사용 후 렌더링
1-1. getStaticProps()
페이지 내용이 외부 데이터에 의존할 때 사용
// pages/posts.js
export default Post = (posts) =>{
    // 렌더링 로직
}

// 빌드 타임 시 호출
export async function getStaticProps({ params }) {
    // params: 라우트 파라미터들로 이뤄진 객체 (정적 라우트 페이지라면 undefined)

    // API 호출
    const response = await fetch('https://example.com/posts');
    const posts = await response.json();

    // 리다이렉션 객체 사용해 리다이렉션
    if (!posts) {
      return {
        redirect: {
          destination: '/',
          permanent: false,
          // statusCode: 301
        },
      }
    }


    return {
        props: { posts }, // Post 컴포넌트가 전달받을 props 객체 (key - value)
        revalidate: false, // 페이지 재 생성 시간(초)
        notFound: false // 404 페이지 반환 여부
    };
}
TODO:
1-2. getStaticPath()
동적 경로를 사용할 때, 사전 렌더링 하기 위해서 사용 (getStaticProps와 함께)
TODO:
정리
- CDN에 의해 캐싱되어 성능 향상이 가능
- 페이지 내용 -> getStaticProps(), 페이지 경로 -> getStaticPaths
- 두 함수는 비동기적으로 프로미스 반환 가능
- 개발 모드에서는 매 요청마다 호출
- 함수 내에서 사용되는 로직은 브라우저에 전달되는 js번들에 포함되지 않는다
2. Server-side Rendering (SSR)
서버 측에서 렌더링 되며 캐시 제어 헤더(Cache-Control 헤더)가 구성된 경우에만 CDN에 캐시
- 빌드 실행중에 실행x
- 클라이언트 측에서 요청시에 만들어진다.
- SSG보다 느린 성능
- 매 요청마다 페이지 내용이 업데이트 되어야 하는 경우
2.1) getServerSideProps()
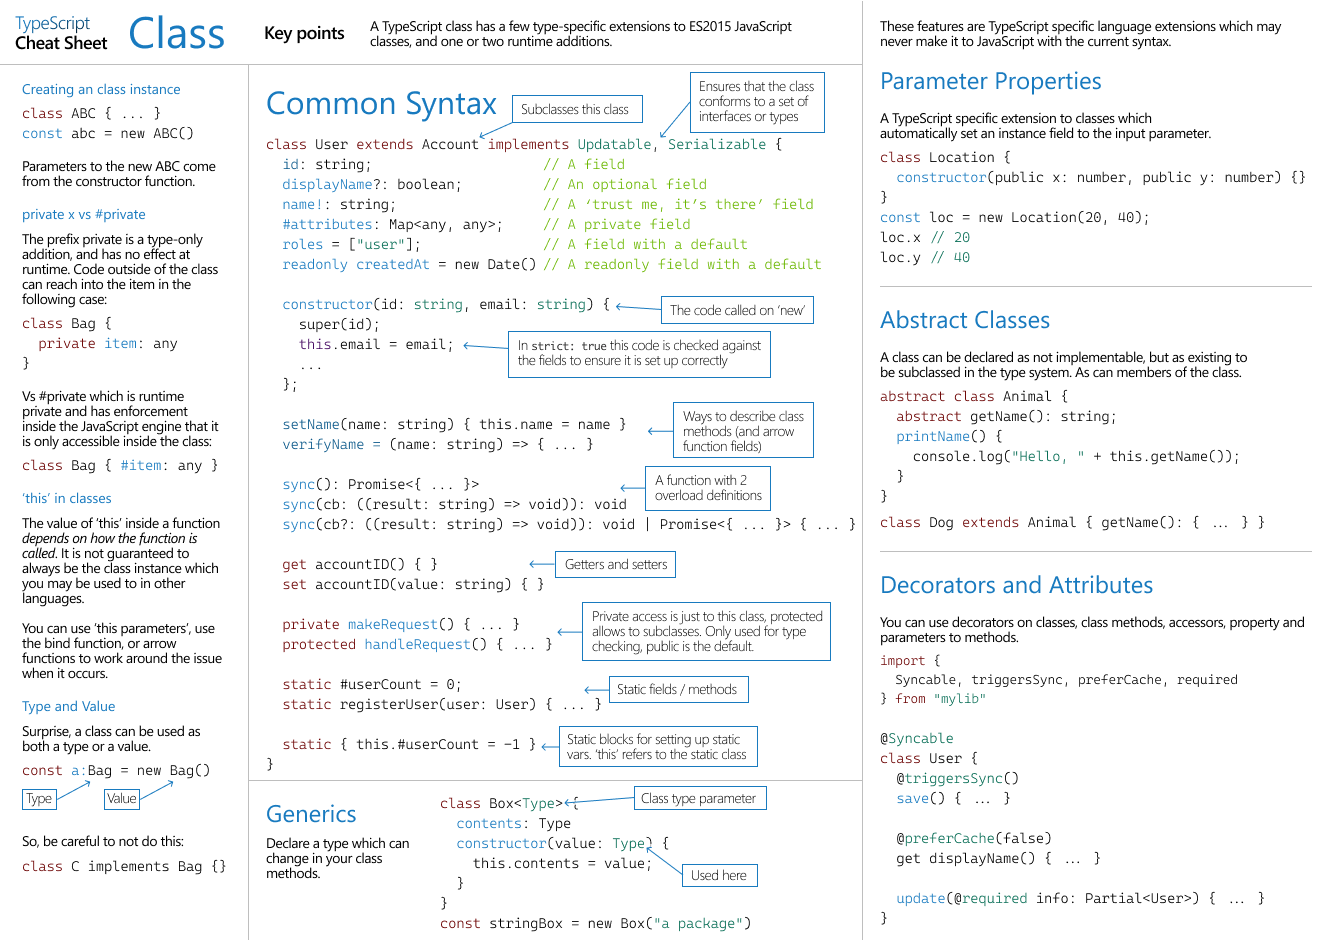
TypeScript
자바스크립트의 슈퍼셋(superset) 언어
컴파일 명령어
# build
npx tsc {파일명}

# build 후 바로 실행
npx ts-node {파일}

# 컴파일 된 js파일 실행
node {빌드 된 파일}
변수 선언 하면서 타입 지정
특징
1. 타입
| Type | Keyward |
|---|---|
| 문자열 | String |
| 숫자 | Number |
| 불 | Boolean |
| 배열 | number[] / Array |
| 튜플 | [string, number]] |
| 모든 타입 허용 | Any |
| undefind, null | void |
| 함수 끝에 절대 도달하지 않는 의미 | Never |
배열 선언 시 ReadonlyArray
let arr: ReadonlyArray<number> = [1, 2, 3]2. 함수 작성 방법
3가지 타입 정의
- 함수의 파라미터(매개변수) 타입
- 함수의 반환 타입 (타입을 정하지 않을 때 void 사용)
- 함수의 구조 타입
// b? : number -> 매개변수 만큼 인자 넘기지 않아도 되는 특성 적용
// b = '100' -> 초기화
function sum(a: number, b: number, ...nums: number[]): number {
  return a + b
}- **?**을 사용해 매개변수 만큼 인자 넘기지 않아도 되는 특성 적용 가능
- REST 문법 적용 가능
this
this 타입 지정 가능
예제
interface App {
el: string
counter: number
init(this: App): () => {}
}
let app: App = {
el: '#app',
count: 10,
init: function (this: App) {
return () => {
return this.count
}
},
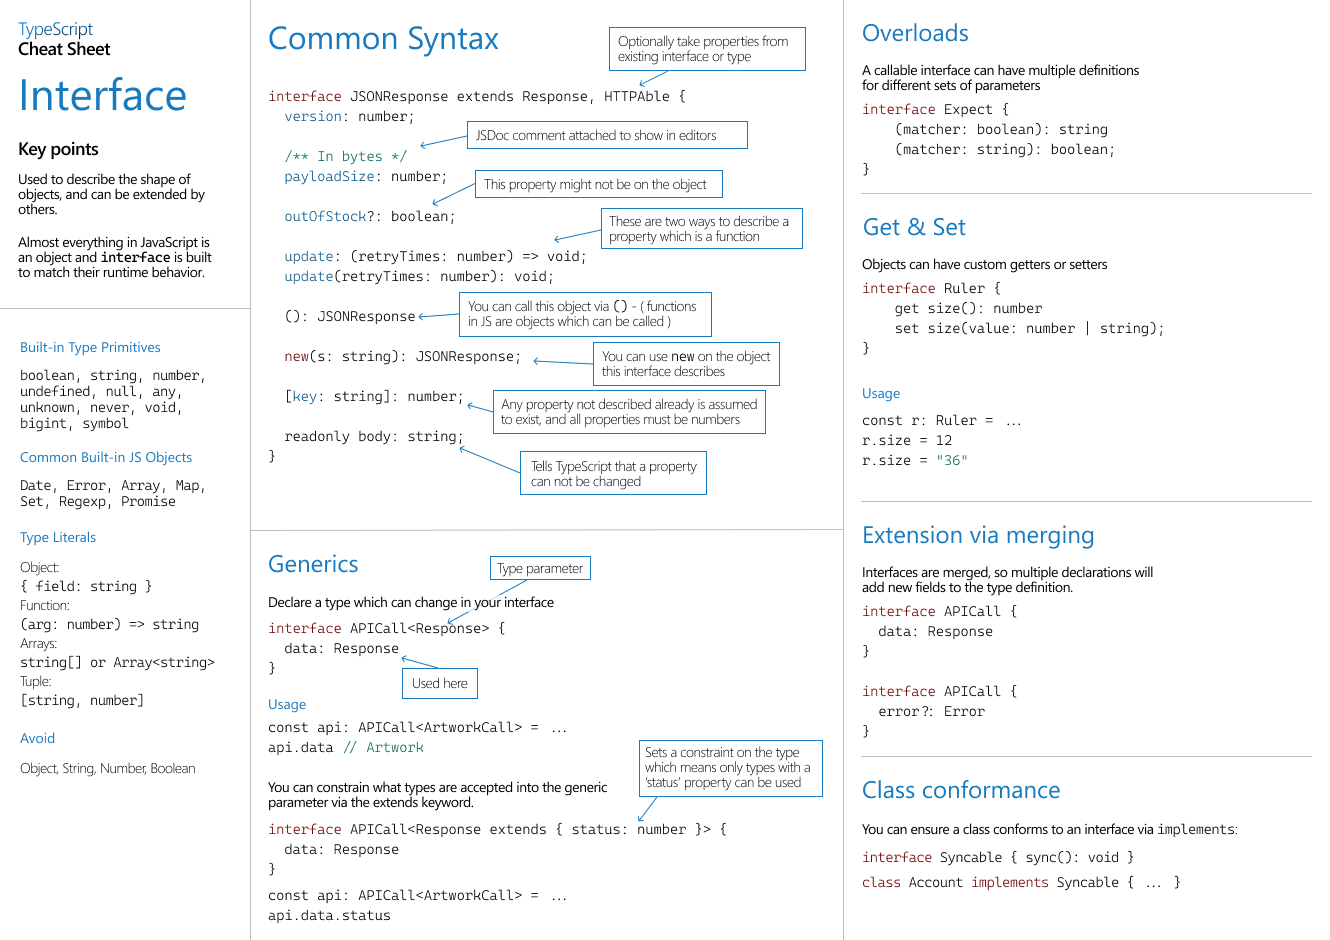
}3. 인터페이스
// object
interface User {
  name: string
  readonly age?: number
  hp?: string
}

// object extension
interface Driver extends Person {
  skill: string
}

// function
interface login {
  (username: string, password: string): boolean
}

// class
interface Car {
  carName: string
  setName(beer: string): void
}
readonly vs const
변수는 const / 프로퍼티 readonly
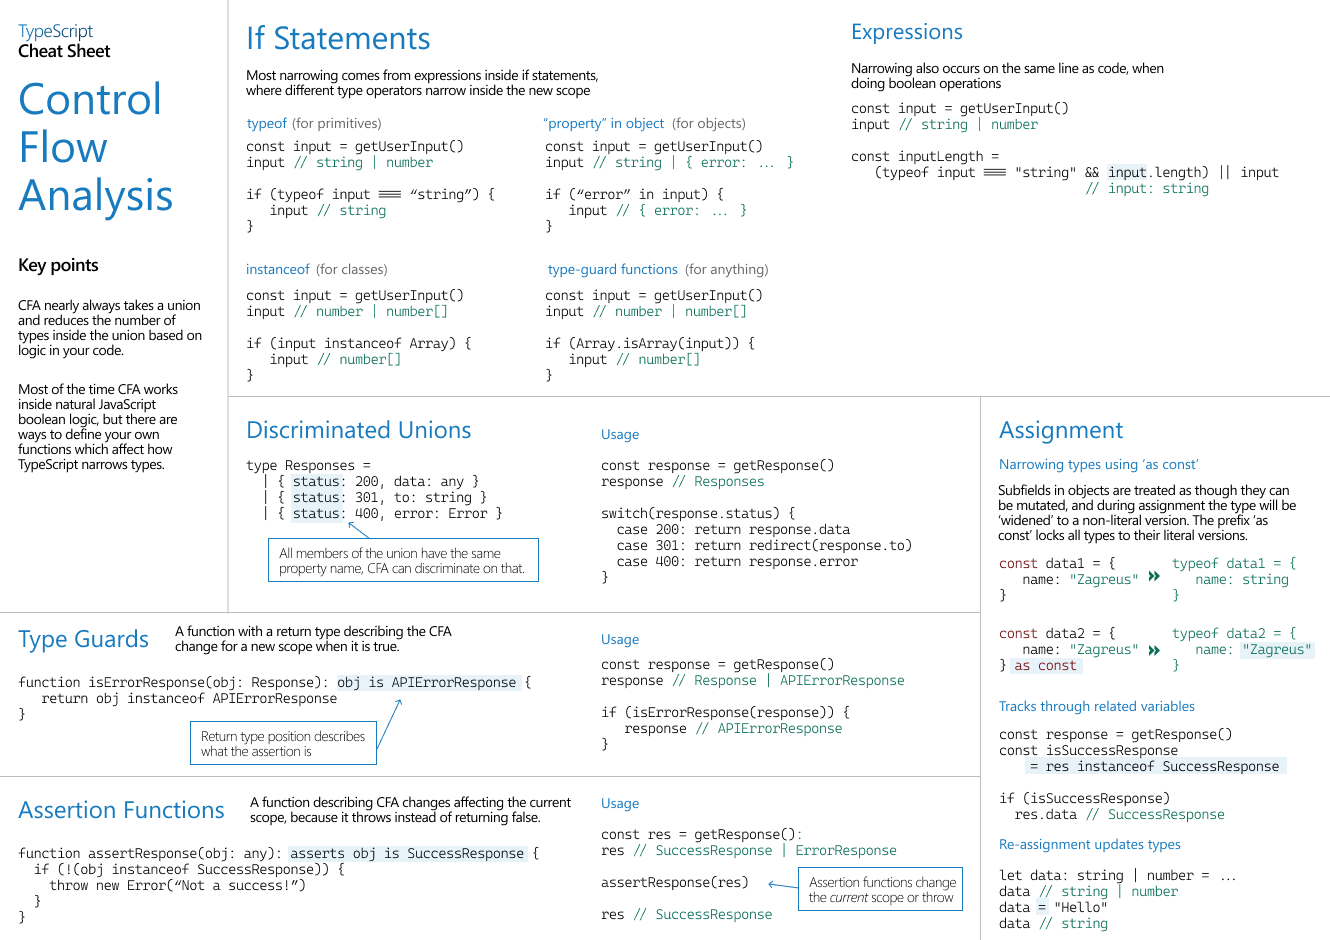
타입 추론
타입 표기가 없는 경우 타입을 추론한다.
가장 적절한 타입(Best Common Type)
표현식의 타입을 사용해 “최적 공통 타입” 계산
문맥상의 타이핑(Contextual Typing)
코드의 위치(문맥)를 기준으로 실행
Union Type
타입을 정의할 때 한개 이상의 타입을 사용
function go(speed: string, direction: string | number) {
// ...
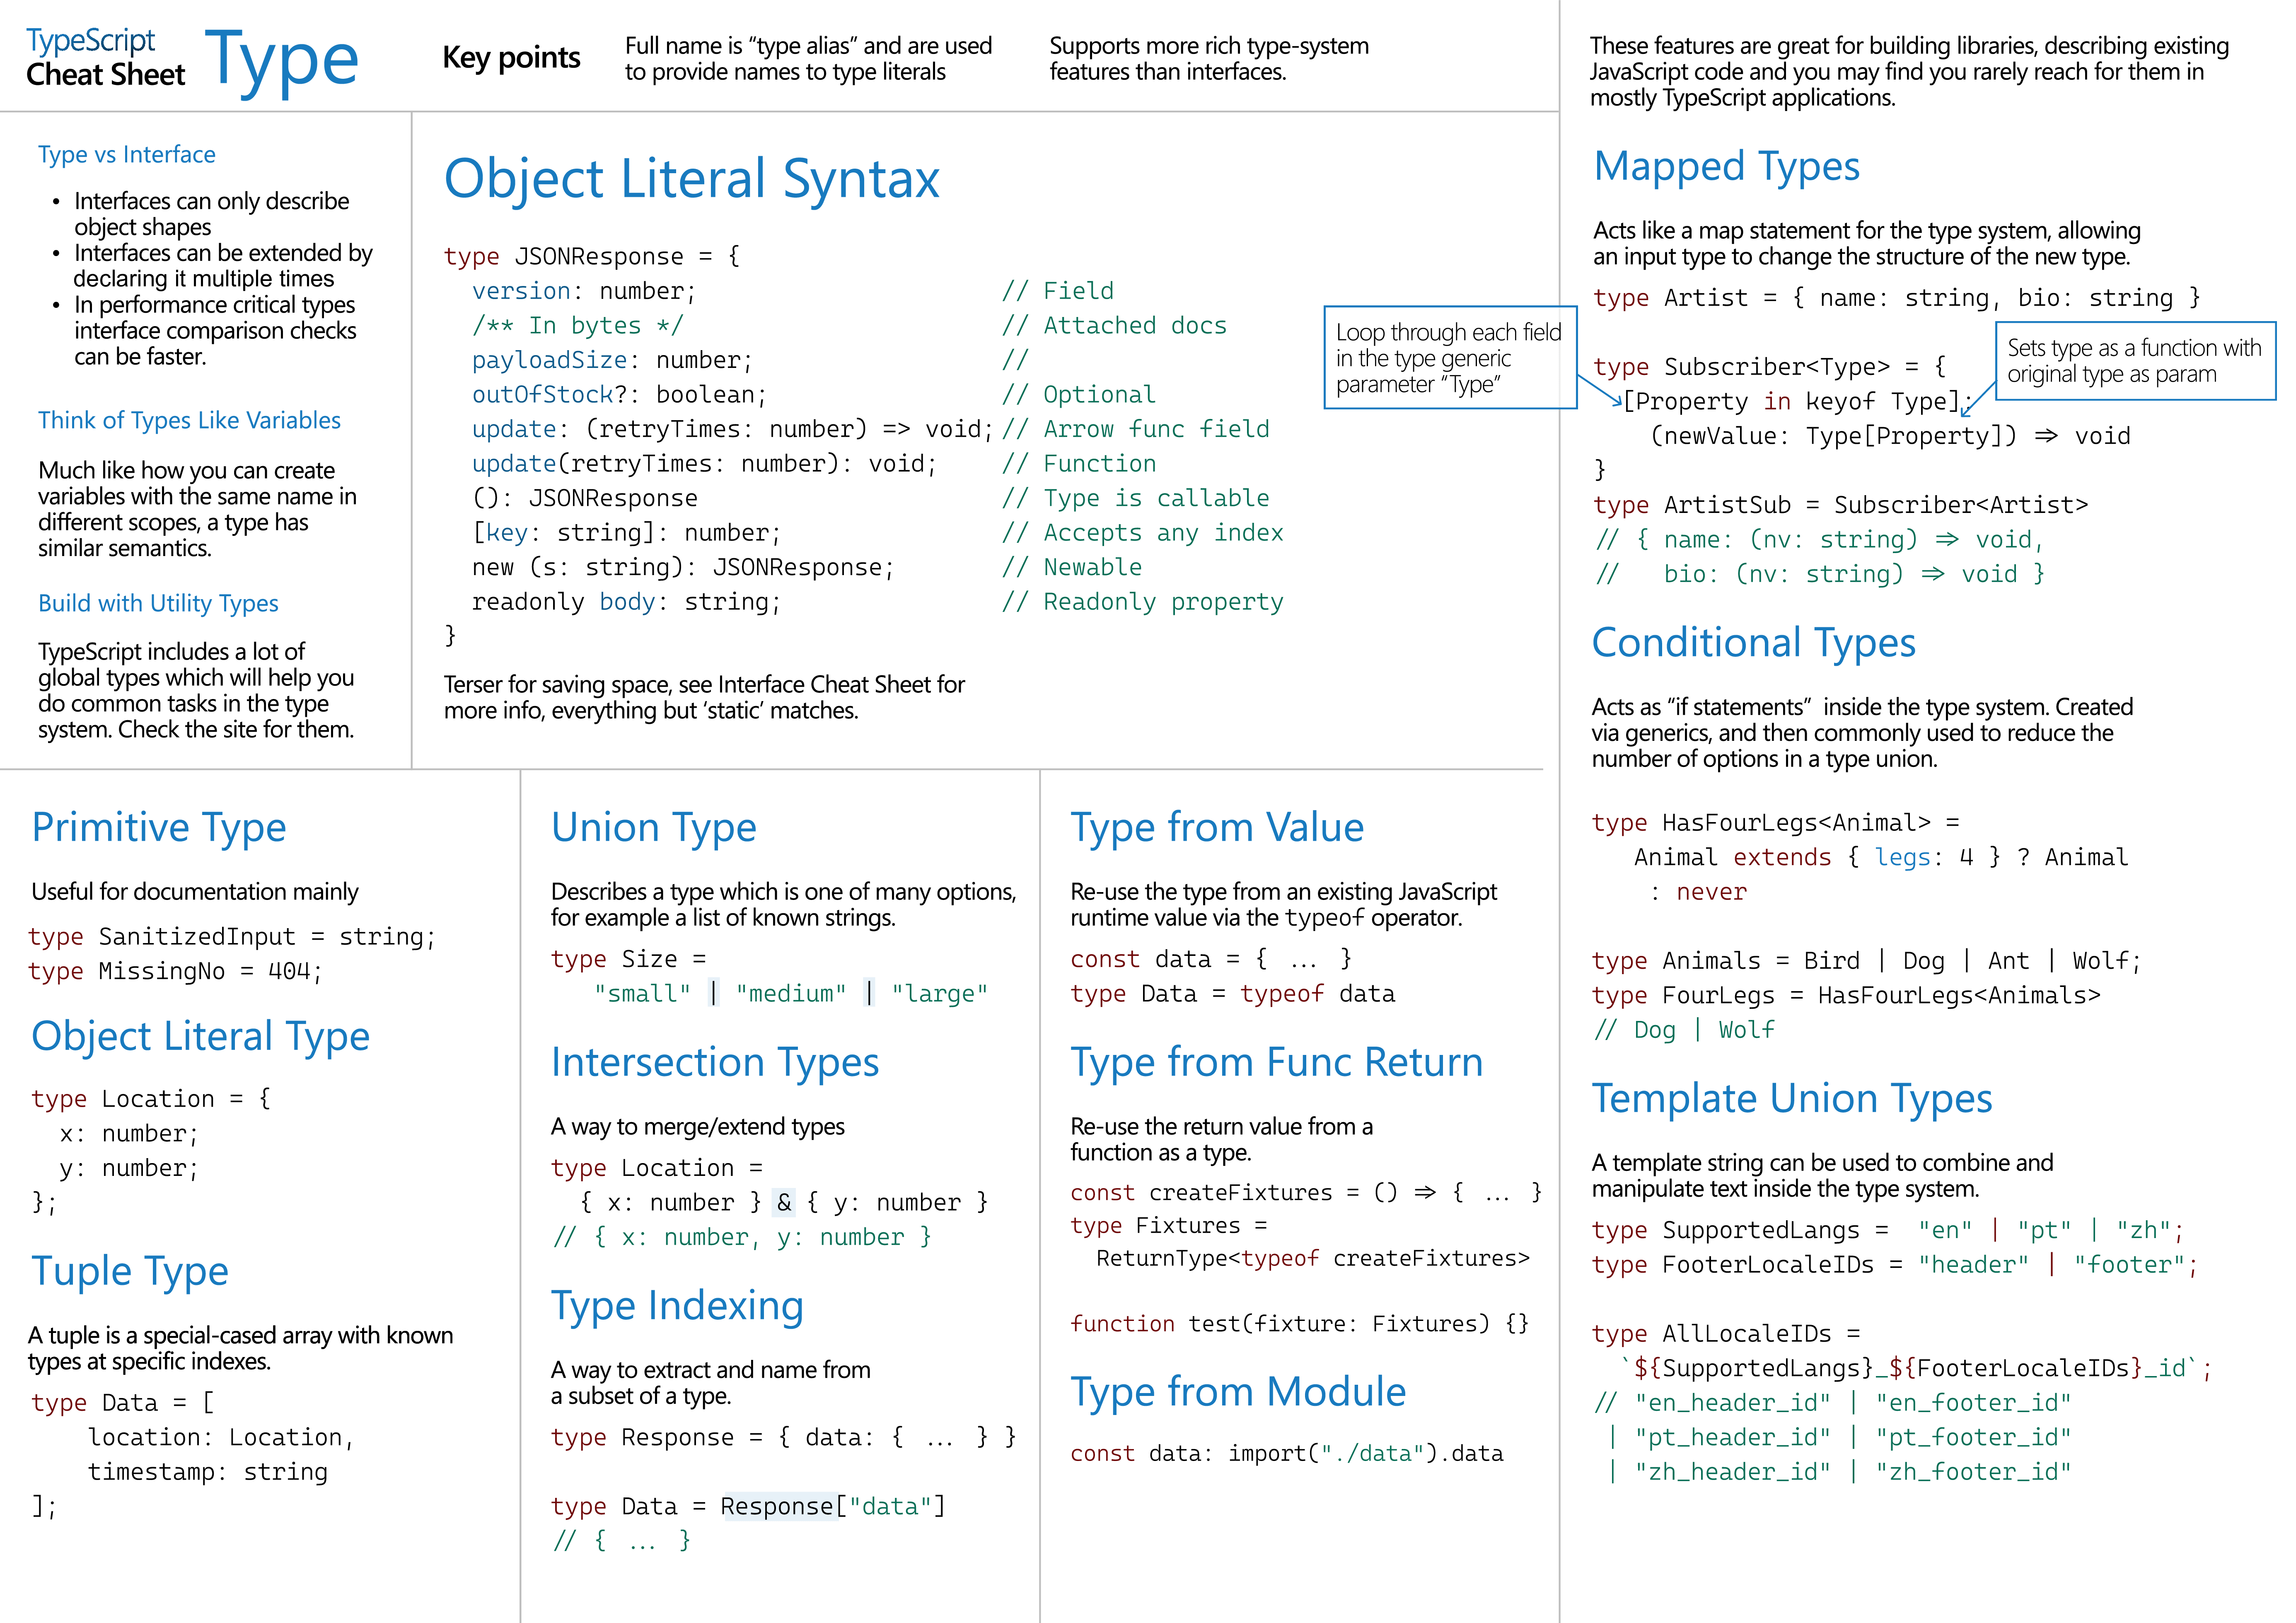
}타입 별칭
타입의 새로운 이름 생성
type Name = string
type NameResolver = () => string
type NameOrResolver = Name | NameResolver
제네릭
타입을 유연하게 처리, 런타임 시 발생할 수 있는 타입에러를 컴파일전에 검출
- 파라미터 타입이나 리턴 타입에 대한 정의를 외부로 미룬다
- 타입에 대해 유연성, 안정성 확보
- 런타임 환경에 아무런 영향이 없는 컴파일 시점의 전처리 기술
- 유저가 준 인수의 타입을 캡처하고, 사용할 수 있게 해주는 T 타입변수 사용
- 제약 조건 사용 시 제약 조건을 명시하는 인터페이스 생성 후 extends 키워드로 명시
let arrayType: number | string

function insertAtBeginning<T extends typeof arrayType>(array: T[], value: T) {
  const newArray = [value, ...array]
  return newArray
}

const updatedArray = insertAtBeginning([1, 2, 3], -1)
const stringArray = insertAtBeginning(['a', 'b', 'c'], 'd')
사용할 떈 제네릭 - typescript kr 문서 보고 참고
보기 편한 Typescript cheet
React + Typescript
- Typescript로 작성된 React 앱에선 tsx파일 사용 -> jsx문법 사용해서
interface todoProps {
  items: Todo[];
  addTodo: (text: string) => void;
  removeTodo: (id: string) => void;
}

function NewTodo(props: todoProps) {
  const todoTextInputRef = useRef<HTMLInputElement>(null);
  const [isVisible, setIsVisible] = useState<boolean>(false);

  // ...

  return (
    // rendering code
  )
}
컴포넌트를 사용할 때 interface로 props 타입을 선언하고 사용하면 된다.
tsconfig.json
tsconfig.json파일로 컴파일과 관련된 사항들을 설정한다.
{
  "compilerOptions": {
    "target": "es5",
    "lib": ["dom", "dom.iterable", "esnext"],
    "allowJs": true,
    "skipLibCheck": true,
    "esModuleInterop": true,
    "allowSyntheticDefaultImports": true,
    "strict": true,
    "forceConsistentCasingInFileNames": true,
    "noFallthroughCasesInSwitch": true,
    "module": "esnext",
    "moduleResolution": "node",
    "resolveJsonModule": true,
    "isolatedModules": true,
    "noEmit": true,
    "jsx": "react-jsx"
  },
  "include": ["src"]
}
HTMLInputElement같은 기본 타입을 사용할 수 있는데
lib 부분에 dom라이브러리를 추가했기 때문에 사용할 수 있음