스프링 기반 REST API 개발 - 백기선
강의 후기
우선… 버전 문제 때문에 강의를 들으면서 애를 많이 먹었다. 특히 시큐리티 부분이 따라갈 수 없을 정도로 버전 문제가 많았다.
이번 강의는 REST API의 개념, Spring REST Docs라는 라이브러리로 테스트와 문서작성을 자동화하는 방법을 배운 것으로 마무리 해야겠다.
REST API란
API - Application Programming Interface
REST - REpresentational State Transfer
- 인터넷 상의 시스템 간의 상호 운용성을 제공하는 방법 중 하나
- 시스템 제각각의 독립적인 진화를 보장하기 위한 방법
- REST API : REST 아케텍처 스타일을 따르는 API
REST 아키텍처 스타일
- Client-Server
- Stateless
- Cache
- Uniform Interface
- Layered System
- Code-On-Demand (optional)
Uniform Interface (발표 영상 11분 40초)
- Identification of resources
- manipulation of resources through represenations
- self-descrive messages
- hypermedia as the engine of appliaction state (HATEOAS)
Self-descriptive message
- 메시지 스스로 메시지에 대한 설명이 가능해야 한다.
- 서버가 변해서 메시지가 변해도 클라이언트는 그 메시지를 보고 해석이 가능하다.
- 확장 가능한 커뮤니케이션
HATEOAS
- 하이퍼미디어(링크)를 통해 애플리케이션 상태 변화가 가능해야 한다.
- 링크 정보를 동적으로 바꿀 수 있다. (Versioning 할 필요 없이!)
Self-descriptive message 해결 방법
- 방법 1: 미디어 타입을 정의하고 IANA에 등록하고 그 미디어 타입을 리소스 리턴할 때 Content-Type으로 사용한다.
- 방법 2: profile 링크 헤더를 추가한다. (발표 영상 41분 50초)
- 브라우저들이 아직 스팩 지원을 잘 안해
- 대안으로 HAL의 링크 데이터에 profile 링크 추가
HATEOAS 해결 방법
- 방법1: 데이터에 링크 제공
- 링크를 어떻게 정의할 것인가? HAL
- 방법2: 링크 헤더나 Location을 제공
이벤트 생성 API개발
입력값 제한
- id 또는 입력 받은 데이터로 계산해야 하는 값들은 입력을 받지 않아야 한다.
- EventDto 적용해 controller에서 @RequestBody로 입력받는다
DTO -> 도메인 객체로 값 복사 ModelMapper
<dependency>
            <groupId>org.modelmapper</groupId>
            <artifactId>modelmapper</artifactId>
            <version>2.3.1</version>
</dependency>
입력값 이외에 에러 발생
ObjectMapper 커스터마이징
spring.jackson.deserialization.fail-on-unknown-properties=true
Bad Request 처리하기
@Valid와 BindingResult (또는 Errors)
- BindingResult는 항상 @Valid 바로 다음 인자로 사용해야 함. (스프링 MVC)
- @NotNull, @NotEmpty, @Min, @Max, … 사용해서 입력값 바인딩할 때 에러 확인할 수 있음
도메인 Validator 만들기
- Validator 인터페이스 없이 만들어도 상관없음
HATEOAS와 Self-Describtive Message 적용
HATEOAS란?
- REST Application 아키텍처의 컴포넌트 중 하나
- 하이퍼미디어를 사용해서 애플리케이션 서버의 정보를 동적으로 클라이언트가 정보를 주고 받는 방법이다.
Spring HATEOAS
- REST API를 편리하게 사용할 수 있는 툴을 제공하는 프레임워크
- 링크 만드는 기능
- 문자열 가지고 만들기
- 컨트롤러와 메소드로 만들기
- 리소스 만드는 기능
- 리소스: 데이터 + 링크
- 링크에는 크게 두가지 정보가 있다.
- HREF : URL or URI
- REL : 현재 리소스와의 관계
- self : 자기 자신
- profile : 응답 본문에 대한 문서로 링크를 걸 때
- update-event : 업데이트
- query-event : 조회
스프링 REST Docs 소개
REST Docs
스프링 MVC 테스트를 통해 문서를 생성하는 기능을 제공하는 라이브러리
-
Asciidoc을 사용 -> HTML문서 생성
-
JAVA8이상, SpringFramework 5이상
-
andDo(document(“doc-name”, snippets))
-
snippets
- links()
- requestParameters() + parameterWithName()
- pathParameters() + parametersWithName()
- requestParts() + partWithname()
- requestPartBody() -> 파일 다운로드
- requestPartFields()
- requestHeaders() + headerWithName()
- requestFields() + fieldWithPath()
- responseHeaders() + headerWithName()
- responseFields() + fieldWithPath()
-
Relaxed
-
Processor
- preprocessRequest(prettyPrint())
- preprocessResponse(prettyPrint())
스프링 REST Docs 적용
REST Docs 자동 설정
- @AutoConfigureRestDocs
RestDocMockMvc 커스터마이징
- RestDocsMockMvcConfigurationCustomizer 구현한 빈 등록
- @TestConfiguration
@TestConfiguration
public class RestDocsConfiguration {

    @Bean
    public RestDocsMockMvcConfigurationCustomizer restDocsMockMvcConfigurationCustomizer() {
        return configurer -> configurer.operationPreprocessors()
                .withRequestDefaults(prettyPrint())
                .withResponseDefaults(prettyPrint());
    }
}

@RunWith(SpringRunner.class)
@SpringBootTest
@AutoConfigureMockMvc
@AutoConfigureRestDocs
@Import(RestDocsConfiguration.class) // 주입시켜준다.
public class EventControllerTests {
    ...
}
테스트 할 것
API 문서 만들기
- 요청 본문 문서화
- 응답 본문 문서화
- 링크 문서화
- profile 링크 추가
- 응답 헤더 문서화
Relaxed 접두어 (relaxedResponseFields)
장점: 문서 일부분만 테스트 할 수 있다.
단점: 정확한 문서를 생성하지 못한다.
스프링 REST Docs 문서 빌드
스프링 REST Docs
- https://docs.spring.io/spring-restdocs/docs/2.0.2.RELEASE/reference/html5/
- pom.xml에 메이븐 플러그인 설정
            <plugin>
                <groupId>org.asciidoctor</groupId>
                <artifactId>asciidoctor-maven-plugin</artifactId>
                <version>1.5.3</version>
                <executions>
                    <execution>
                        <id>generate-docs</id>
                        <phase>prepare-package</phase>
                        <goals>
                            <goal>process-asciidoc</goal>
                        </goals>
                        <configuration>
                            <backend>html</backend>
                            <doctype>book</doctype>
                        </configuration>
                    </execution>
                </executions>
                <dependencies>
                    <dependency>
                        <groupId>org.springframework.restdocs</groupId>
                        <artifactId>spring-restdocs-asciidoctor</artifactId>
                        <version>2.0.2.RELEASE</version>
                    </dependency>
                </dependencies>
            </plugin>
            <plugin>
                <artifactId>maven-resources-plugin</artifactId>
                <version>2.7</version>
                <executions>
                    <execution>
                        <id>copy-resources</id>
                        <phase>prepare-package</phase>
                        <goals>
                            <goal>copy-resources</goal>
                        </goals>
                        <configuration>
                            <outputDirectory>
                                ${project.build.outputDirectory}/static/docs
                            </outputDirectory>
                            <resources>
                                <resource>
                                    <directory>
                                        ${project.build.directory}/generated-docs
                                    </directory>
                                </resource>
                            </resources>
                        </configuration>
                    </execution>
                </executions>
            </plugin>
플러그인 부분을 더 자세히 살펴보면
ascii doctor라는 플러그인으로 html을 생성한다.
패키지 할 때 prepare-package라는 phase가 있는데
prepare-package라는 phase에다가 ascii doc을 처리하라고 하는 기능을 끼워 넣은거다.
패키지라는 메이븐 골을 실행할 때 플러그인이 제공하는 process-asciidoc이 실행된 것이다.
process-asciidoc은 기본적으로 asciidoc디렉토리에 들어있는 모든 ascii doc문서를 html로 만들어준다.
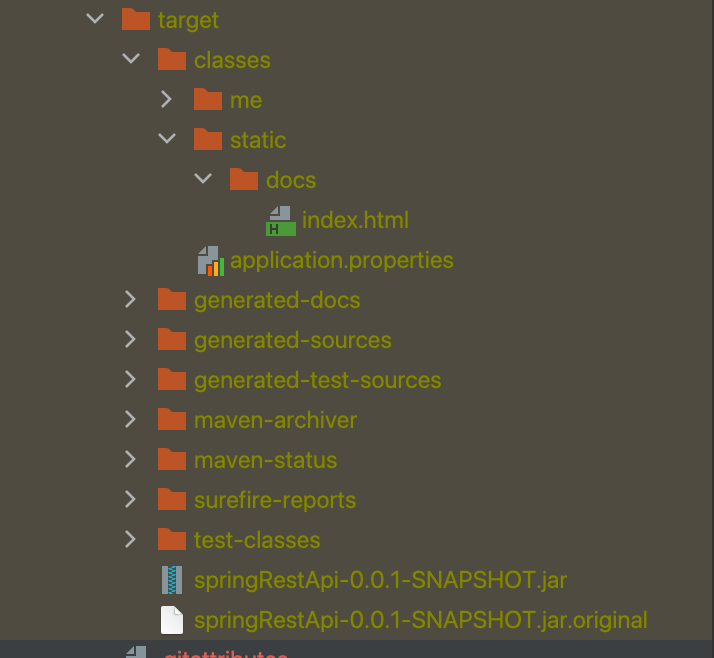
target/static/docs/index.html에 파일을 옮겨준 것은 maven-resources-plugin가 한 것
그래서 순서가 중요 -> 만들고 -> 카피
static폴더 아래있는 파일은 아무 설정하지 않아도 웹서버가 떳을 때 스프링 부트가 제공한다.
빌드된 디렉토리 기준으로 파일을 넣어주면 된다.